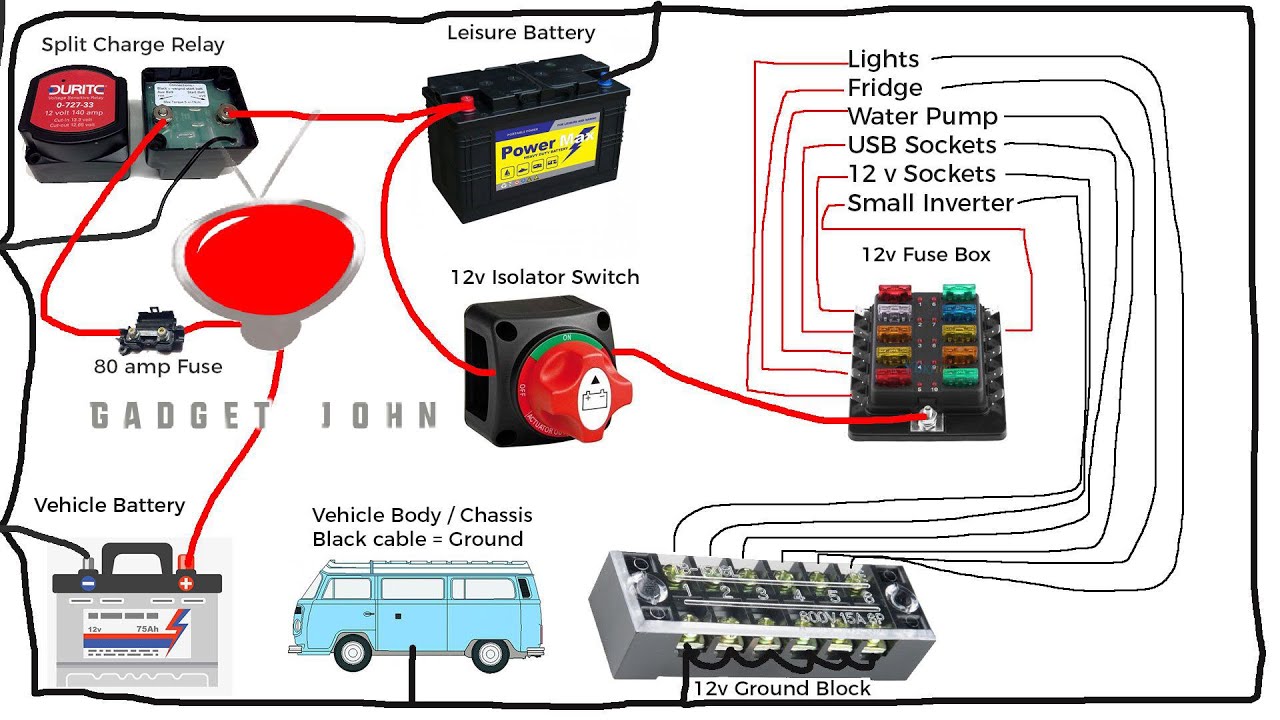
Battery switch on travel trailer function is crucial for managing power. Understanding how to use your battery switch correctly ensures safe and efficient power distribution from shore power, your generator, or your RV’s batteries. This guide breaks down the different types of switches, how to connect and disconnect power sources safely, and troubleshooting common problems. We’ll cover everything from basic operation to advanced battery management techniques, helping you become a pro at keeping your travel trailer powered up.
We’ll explore the various types of battery switches, detailing their functionalities and benefits. You’ll learn the proper procedures for connecting and disconnecting shore power and generator power, emphasizing safety precautions at every step. We’ll also delve into troubleshooting common issues, providing practical solutions and maintenance tips to keep your system running smoothly. Finally, we’ll discuss battery management best practices to maximize your battery life and ensure your travel trailer is always ready for adventure.
Understanding Battery Switch Functionality in Travel Trailers

Your travel trailer’s battery switch is a crucial component for managing power sources and ensuring efficient energy usage. Understanding its function and operation is essential for safe and enjoyable RVing. This section will explain the different types of switches, their purposes, and how to use them correctly.
Types of Battery Switches in Travel Trailers
Travel trailers typically utilize a few common types of battery switches. These switches control the flow of power from your trailer’s batteries to the various 12-volt systems. The most common are the 1-2-Both switches and simple disconnect switches. Understanding the differences is key to selecting the right switch for your needs and using it effectively.
Purpose of a Battery Switch in Managing Power Sources
The battery switch acts as a central control point for your trailer’s electrical system. It allows you to selectively connect and disconnect your house batteries from the various power sources: shore power (hookups at campgrounds), a generator, and your onboard batteries. This control prevents unwanted battery drain when not in use and protects your electrical system from potential problems.
Proper use of the battery switch is critical for extending battery life and preventing electrical issues.
Operating a Battery Switch: A Step-by-Step Guide
Before operating your battery switch, always consult your RV’s owner’s manual for specific instructions. The following is a general guide:
1. Identify the switch
Locate the battery switch, usually near your batteries or in a convenient location inside your trailer. It’s typically a rotary switch with labeled positions.
2. Understand the positions
A typical 1-2-Both switch will have three positions: “1” (connects only battery 1), “2” (connects only battery 2), and “Both” (connects both batteries). A simple disconnect switch will typically have only an “On” and “Off” position.
3. Start with “Off”
Always begin with the switch in the “Off” position before making any connections or changes to your power sources.
4. Connect shore power or generator
If you are connected to shore power or running a generator, you should typically have the battery switch in the “Off” position unless you need to charge the batteries.
5. Select the desired position
Choose the appropriate position based on your needs. If you need to charge your batteries, you’ll likely want to use “Both”. If you only need to use one battery, select “1” or “2” accordingly.
6. Monitor battery levels
Regularly check your battery levels to ensure they are charging properly and not over-discharging.
Comparison of Battery Switch Types
| Feature | 1-2-Both Switch | Disconnect Switch |
|---|---|---|
| Power Source Control | Allows selection of individual batteries or both | Simple on/off control for all batteries |
| Battery Charging | Facilitates charging both batteries simultaneously or individually | Allows charging of all batteries when “On” |
| Complexity | More complex operation | Simpler operation |
| Cost | Generally more expensive | Generally less expensive |
Connecting and Disconnecting Power Sources
Managing your travel trailer’s power sources—shore power, generator, and battery—safely and efficiently is crucial. Understanding how your battery switch interacts with these sources is key to preventing electrical issues and ensuring a smooth camping experience. This section details the procedures for connecting and disconnecting each power source while using your battery switch.Connecting shore power to your travel trailer involves a simple, yet important, sequence of steps.
Always prioritize safety.
So, you’re an audiophile who loves to travel? Awesome! First things first, check out this guide on setting up your audiophile travel setup to ensure pristine sound on the go. Then, don’t forget the practical stuff! Protecting your investment is key, so make sure you look into getting Aon travel insurance for peace of mind – you’ll want to keep your precious gear safe during your adventures.
Happy listening and safe travels!
Connecting Shore Power
Before plugging in, ensure your battery switch is in the desired position. If you want to charge your batteries from shore power, the switch should be in the “Both” or “Battery” position. If you only want to power appliances directly from shore power, the switch can be in the “Shore Power” position. Then, firmly connect the shore power cord to your trailer’s inlet and then to the power source.
After connecting, verify power is flowing by checking your interior lights or appliances. If nothing works, double-check your connections and the position of the battery switch.
Using a Generator
Using a generator introduces another layer to power management. The generator’s output should be connected to your travel trailer’s 30-amp or 50-amp inlet, depending on your setup. The battery switch’s position affects how the generator power is distributed. With the switch in the “Shore Power” position, only appliances directly connected to shore power will function. In the “Both” position, the generator will power appliances and charge the batteries simultaneously.
The “Battery” position will only allow the use of power stored in the batteries, while the generator will be inactive. Always consult your generator and RV manuals for specific instructions.
Safety Precautions When Switching Power Sources
Switching between power sources requires caution. Never connect or disconnect shore power or generator power while the battery switch is in the “Off” position. Doing so can lead to unexpected voltage surges. Always turn off appliances before switching power sources to prevent damage. Also, regularly inspect your power cords for wear and tear, and replace them immediately if any damage is detected.
Avoid overloading circuits by using too many appliances simultaneously.
So, you’re an audiophile who loves to travel? Awesome! First, check out this guide for the best audiophile travel setup to ensure your tunes sound amazing on the go. Then, before you jet off, remember to sort out your travel insurance. Getting Aon travel insurance is a smart move; you don’t want to be stuck with unexpected medical bills in a foreign country.
Peace of mind is priceless, right? Happy travels!
Disconnecting All Power Sources
Before performing any maintenance on your travel trailer’s electrical system, completely disconnect all power sources. First, turn off the battery switch to the “Off” position. Next, disconnect the shore power cord from both the trailer and the power source. Finally, if using a generator, disconnect it from the trailer. This ensures your safety and prevents accidental electrical shocks or damage to the electrical system.
Remember to always follow the manufacturer’s instructions found in your RV and appliance manuals.
Troubleshooting Common Battery Switch Issues
Your travel trailer’s battery switch is a critical component, ensuring you can seamlessly switch between shore power, your trailer’s batteries, and potentially even a generator. Problems with this switch can leave you stranded without power, so understanding how to troubleshoot issues is essential. This section covers common problems and solutions to get you back on the road.
Battery switch malfunctions often stem from simple issues, but sometimes more serious problems require professional attention. Let’s explore the most frequent culprits and how to address them.
Corrosion on Battery Switch Terminals, Battery switch on travel trailer function
Corrosion is a common enemy of electrical connections, and your battery switch is no exception. Over time, moisture and air can react with the metal terminals, creating a build-up of oxides that impede the flow of electricity. This manifests as weak or nonexistent power to your trailer’s systems. The telltale signs are a white, green, or blue powdery substance on the terminals and often a noticeable resistance when trying to connect a cable.
To resolve this, you’ll need a wire brush, baking soda, and water. First, disconnect the battery cables from the switch. Then, vigorously scrub the terminals with the wire brush to remove the corrosion. Next, make a paste of baking soda and water, apply it to the terminals, and let it sit for a few minutes to neutralize any remaining acid.
Finally, rinse thoroughly with clean water, dry everything completely, and reconnect the cables, ensuring a tight fit.
Loose Connections at the Battery Switch
Loose connections are another frequent source of battery switch problems. Vibrations during travel can loosen the bolts securing the cables to the switch, leading to intermittent power or complete failure. Check all connections for tightness. If the bolts are loose, tighten them securely with the appropriate wrench. If the connections are corroded (see above), clean them before tightening.
It’s a good idea to apply a small amount of dielectric grease to the terminals after cleaning to prevent future corrosion. This grease helps repel moisture and keeps the connection clean.
Faulty Battery Switch
Sometimes, the problem lies within the switch itself. Internal components can fail due to age, wear, or damage. If you’ve checked all connections and cleaned all terminals, and the switch still doesn’t work, the switch itself may be faulty. Replacing the switch is usually the best course of action. Before purchasing a replacement, carefully note the switch’s amperage rating and any other specifications to ensure compatibility.
Importance of Regular Maintenance
Regular inspection and maintenance of your battery switch can prevent many problems. At least once a year, or more frequently if you use your trailer often in wet conditions, inspect the terminals for corrosion. Tighten any loose connections and clean any corrosion as described above. This simple maintenance will significantly extend the life of your battery switch and help prevent unexpected power outages.
Proactive maintenance is much easier and cheaper than emergency repairs on the road.
Battery Switch and Battery Management
Your travel trailer’s battery switch is more than just an on/off switch; it’s a crucial component of your overall battery management system. Understanding its role is key to maximizing battery life and avoiding costly problems. It acts as a gatekeeper, controlling the flow of power between your batteries and the various electrical systems in your trailer.The battery switch directly impacts how your batteries charge and discharge.
With the switch in the correct position, your batteries can receive power from your tow vehicle’s charging system or shore power. Conversely, it isolates the batteries when not in use, preventing unwanted drain and preserving their charge. Incorrect usage can lead to premature battery failure or even dangerous situations.
Battery Switch Operation and Power Flow
Imagine a simple system: Your trailer has two 12-volt batteries connected in parallel (increasing amperage capacity). A three-position battery switch (OFF, Battery, Both) controls the power flow.Let’s visualize the electricity flow. In the diagram, imagine a rectangle representing each battery (Battery 1, Battery 2), another for the trailer’s electrical system (Load), and a rectangle for the external charging source (Shore Power/Vehicle).
Arrows indicate the direction of electrical flow. OFF: No connection between batteries and the load. No charging occurs. Battery: Only Battery 1 (or whichever battery is selected in a dual-battery system) is connected to the load. The other battery remains isolated.
Charging from an external source would only charge the connected battery. Both: Both batteries are connected in parallel to the load, providing greater amperage capacity. Charging from an external source charges both batteries simultaneously.
Best Practices for Maintaining Battery Health
Proper battery maintenance is essential for extending their lifespan and ensuring reliable power for your travel trailer. Here are some key practices:Regularly inspect your batteries for corrosion on terminals. Clean them with a wire brush and baking soda solution.Always disconnect your batteries when storing your trailer for extended periods to prevent parasitic drain.Use a battery tender or trickle charger to maintain a full charge during storage.
This prevents sulfation, a common cause of battery failure.Avoid deep discharging your batteries regularly. Deep discharges significantly shorten battery life. Monitor your battery voltage using a voltmeter to prevent this.Choose the right type and size of battery for your needs. Consider AGM or lithium batteries for longer life and better performance compared to flooded lead-acid batteries. Consult a professional for recommendations.
Safety Considerations and Best Practices
Working with your travel trailer’s battery system requires careful attention to safety. Improper handling can lead to serious injury or damage to your equipment. Understanding and following these safety precautions is crucial for a safe and enjoyable RV experience. This section will Artikel essential safety measures to protect yourself and your RV.Proper safety gear is paramount when working with batteries and electrical systems.
Batteries produce corrosive acids and can generate sparks, while electrical connections carry potentially lethal voltages. Neglecting safety precautions can have severe consequences.
Personal Protective Equipment (PPE)
Always wear appropriate safety gear when working with your RV’s battery system. This includes safety glasses to protect your eyes from splashes of battery acid, rubber gloves to prevent acid burns and electrical shocks, and closed-toe shoes to protect your feet from dropped objects or accidental spills. Consider using a respirator if working in a poorly ventilated area, as battery fumes can be harmful.
Long sleeves and pants are also recommended to protect your skin. Never work on electrical systems while wearing loose clothing or jewelry that could become entangled.
Preventing Electrical Hazards
Before working on any electrical system, ensure the power is disconnected from both the shore power and the battery. This can be achieved by turning off the breaker box and disconnecting the battery switch. Double-check to ensure the power is off before proceeding with any work. Never work on wet or damp surfaces, as this increases the risk of electrical shock.
Keep a fire extinguisher nearby, especially when working near batteries. Batteries can generate hydrogen gas, which is highly flammable.
- Always disconnect the negative (-) battery terminal first when disconnecting the battery.
- When reconnecting, connect the positive (+) terminal first.
- Inspect all wiring and connections for any signs of damage or corrosion before connecting power.
- Use insulated tools to prevent accidental shocks.
- Never touch exposed wires or terminals while the system is energized.
- If you are unsure about any aspect of the electrical system, consult a qualified RV technician.
Consequences of Improper Battery Switch Usage
Improper use of the battery switch can lead to a range of problems, from minor inconveniences to serious damage. For instance, accidentally leaving the switch in the “off” position while connected to shore power could cause the house batteries to drain. Conversely, leaving the switch on while disconnected from shore power will drain the batteries, potentially leaving you without power when you need it most.
More seriously, incorrect wiring or connections can lead to short circuits, overheating, fires, and potentially even explosions. Ignoring safety precautions can result in significant damage to your RV and, more importantly, personal injury. Always prioritize safety when working with electrical systems.
Types of Batteries and Compatibility with Battery Switches
Choosing the right battery and battery switch for your travel trailer is crucial for reliable power. Different battery types have varying voltage outputs, charging requirements, and sensitivities, directly impacting the type of switch you’ll need. Understanding these differences ensures a safe and efficient power system.
RV batteries primarily fall into two categories: lead-acid and lithium-ion. Lead-acid batteries, the more traditional choice, are further divided into flooded, gel-cell, and AGM (Absorbent Glass Mat) types. Lithium-ion batteries are a newer, more advanced technology offering higher energy density and longer lifespan. The selection of a battery type significantly influences the choice of battery switch, particularly concerning voltage and charging characteristics.
Lead-Acid Battery Compatibility with Battery Switches
Lead-acid batteries, common in RVs, operate at 12 volts (or sometimes 6 volts in series configurations). Most standard RV battery switches are designed for 12-volt lead-acid batteries. However, the specific type of lead-acid battery (flooded, gel-cell, or AGM) can influence the choice of switch. Flooded lead-acid batteries require more careful handling due to the potential for acid spills, so a switch that offers robust protection is advisable.
Gel-cell and AGM batteries are less prone to spillage and generally more tolerant of vibration, allowing for a wider selection of switches. A simple two-battery switch, allowing switching between house batteries and a starting battery, is often sufficient for a basic lead-acid setup. More complex switches may offer features like a disconnect for maintenance.
Lithium-Ion Battery Compatibility with Battery Switches
Lithium-ion batteries are increasingly popular in RVs due to their lighter weight, longer lifespan, and higher energy density. However, they operate differently than lead-acid batteries and require specific consideration when choosing a battery switch. Lithium-ion batteries typically have a higher voltage (12.8V nominal) and more sensitive charging profiles. A standard lead-acid battery switch may not be suitable, as it might not properly handle the higher voltage or the specific charging characteristics of lithium-ion batteries.
Dedicated lithium-ion battery switches are designed to accommodate the higher voltage and often include features like Bluetooth connectivity for monitoring battery health and voltage. These switches often incorporate built-in Battery Management Systems (BMS) for added safety and optimal charging. Using an incorrect switch with lithium-ion batteries can damage the battery or even create a safety hazard.
Selecting the Right Battery Switch for Your RV Setup
The choice of battery switch depends heavily on the type and number of batteries in your RV. For a simple setup with two 12-volt lead-acid batteries (one for starting and one for house power), a basic two-battery switch is usually adequate. If you have multiple batteries or are using lithium-ion batteries, a more sophisticated switch with features like individual battery monitoring, load balancing, and BMS integration is recommended.
For example, an RV with two 6-volt golf cart batteries wired in series to create a 12-volt system would still use a standard 12-volt battery switch, but careful attention should be paid to the amperage rating of the switch to ensure it can handle the current draw of the batteries. Conversely, a system with four 12-volt lithium-ion batteries would necessitate a more advanced switch capable of handling the higher voltage and providing individual battery monitoring and protection.
Always check the manufacturer’s specifications to ensure the switch is compatible with your specific battery type, voltage, and amperage requirements.
Mastering your travel trailer’s battery switch is key to a smooth and safe RVing experience. By understanding the different switch types, proper connection and disconnection procedures, and common troubleshooting steps, you can confidently manage your power sources and extend the life of your batteries. Remember safety first – always disconnect power before performing any maintenance. With a little knowledge and practice, you’ll be an expert at keeping the lights on, no matter where your adventures take you!
FAQ Explained: Battery Switch On Travel Trailer Function
What happens if I accidentally leave my battery switch in the wrong position?
Depending on the position, you might drain your batteries or prevent them from charging. Always double-check the switch position before leaving your RV.
How often should I check my battery switch for corrosion?
Inspect your battery switch at least once a year, or more frequently if you travel in wet or humid conditions. Corrosion can severely impact performance.
Can I use any type of battery with my travel trailer’s battery switch?
No, compatibility depends on the switch and battery type (lead-acid, lithium, etc.). Check your switch’s specifications and your battery’s requirements to ensure they are compatible.
My battery switch is making a clicking noise. What could be wrong?
This could indicate a loose connection or a faulty switch. Inspect the connections and consider replacing the switch if the problem persists.
